

NuShell FFMpeg Utils
Intro
个人经常将 Onedrive 收藏的 h264 视频转码为 vp9/av1/hevc 等格式,理想情况下能节省 50%的体积(没统计,纯靠记忆)。工作一般包含下面三个任务:
人工批量操作耗时费力,因此编写了部分 Nushell 函数,利用 Nushell 的并行任务(par-each)特性,对视频进行批量的处理。例如转码是相当耗时的操作,那么就可以在睡前执行 caffeinate -i nu --config $nu.config-path -c "vp9 ./",等第二天醒了视频基本就压缩好了。
Quick Installation
下载 ffmpeg.nu[1],在 config.nu 中 source /path/to/ffmpeg.nu$ cd $nu.default-config-dir$ wget -O ./ffmpeg.nu https://raw.githubusercontent.com/Efterklang/dotfiles/refs/heads/main/shells/nushell/aliases/alias.nu$ echo 'source ./ffmpeg.nu' | save --append $nu.config-path
Required Knowledge
Nushell Features
- Operators | Nushell#spread-operator 用于处理可变参数,允许函数接收多个输入路径
- Closure | Nushell 可类比其他语言中的匿名函数,可作为参数传递给
each或par-each - each and par-each | Nushell 迭代处理数据,其中
par-each支持并行执行,充分利用多核 CPU,加快任务处理速度
FFMPEG
ffprobe用于查看媒体文件的元数据(如编码格式、分辨率、时长等),一般跟ffmpeg捆绑下载的- ffmpeg 强大的音视频处理工具,支持转码、格式转换等操作。一行
ffmpeg -i input.mp4 -vcodec vp9 output.mp4即可将视频转码为 VP9;ffmpeg支持更精细的参数调整,比如视频质量这些,这里就不介绍了
MISC
- 容器格式 (mp4, webm etc.)
- Encoding & Decoding
- Software Encoding & Software Decoding:依赖 CPU 处理,兼容性好但速度较慢
- Hardware Encoding & Hardware Decoding:利用 GPU 加速,效率更高(需硬件支持)
选择 Software Encoding 或 Hardware Encoding 看个人权衡,网上资料总结来看,Hardware Encoding 速度更快,但质量相对差一点,要保证质量不损失的话需要适当调整 crf,q:v 等参数。
可以执行 ffmpeg -hwaccels 命令查看 PC 支持的硬件加速方式。也可参考下面链接,查看厂商对硬件编码的支持情况
- Nvidia (包含最新的 Nvidia 产品): Video Encode and Decode GPU Support Matrix | NVIDIA Developer
- Intel, Nvidia, Amd (截止 2023 年 6 月 8 日) 三大显卡厂商(Intel NVIDIA AMD)产品对硬件解码编码支持程度列表 - 重庆 Debug - 博客园
- Apple Silicon : M3 芯片对硬件加速解码的支持情况如下,里面 hevc 压缩率还可以,ffmpeg 相关参数设置可参考 macos - Optimally using hevc_videotoolbox and ffmpeg on OSX - Stack Overflow
$ ffmpeg -hide_banner -encoders | grep videotoolbox V....D h264_videotoolbox VideoToolbox H.264 Encoder (codec h264) V....D hevc_videotoolbox VideoToolbox H.265 Encoder (codec hevc) V....D prores_videotoolbox VideoToolbox ProRes Encoder (codec prores使用场景
在处理媒体文件前,需要先定位目标文件。编写了一个 private helper function,通过 spread operator ... 支持传入多个路径(文件或目录),并筛选出 .mp4 或 .webm 格式的文件:def _find_media_paths [...paths: string] { let ext_pattern = '\.(mp4|mov|webm)$' # 如果没有指定路径,则默认使用当前目录 let files = if ($paths | is-empty) { ls . | where name =~ $ext_pattern } else { # 如果指定了路径,则迭代查找这些路径下的文件 $paths | each {|p| let expanded = ($p | path expand) ls $expanded | where name =~ $ext_pattern } | flatten } return $files}
分析视频编码分布
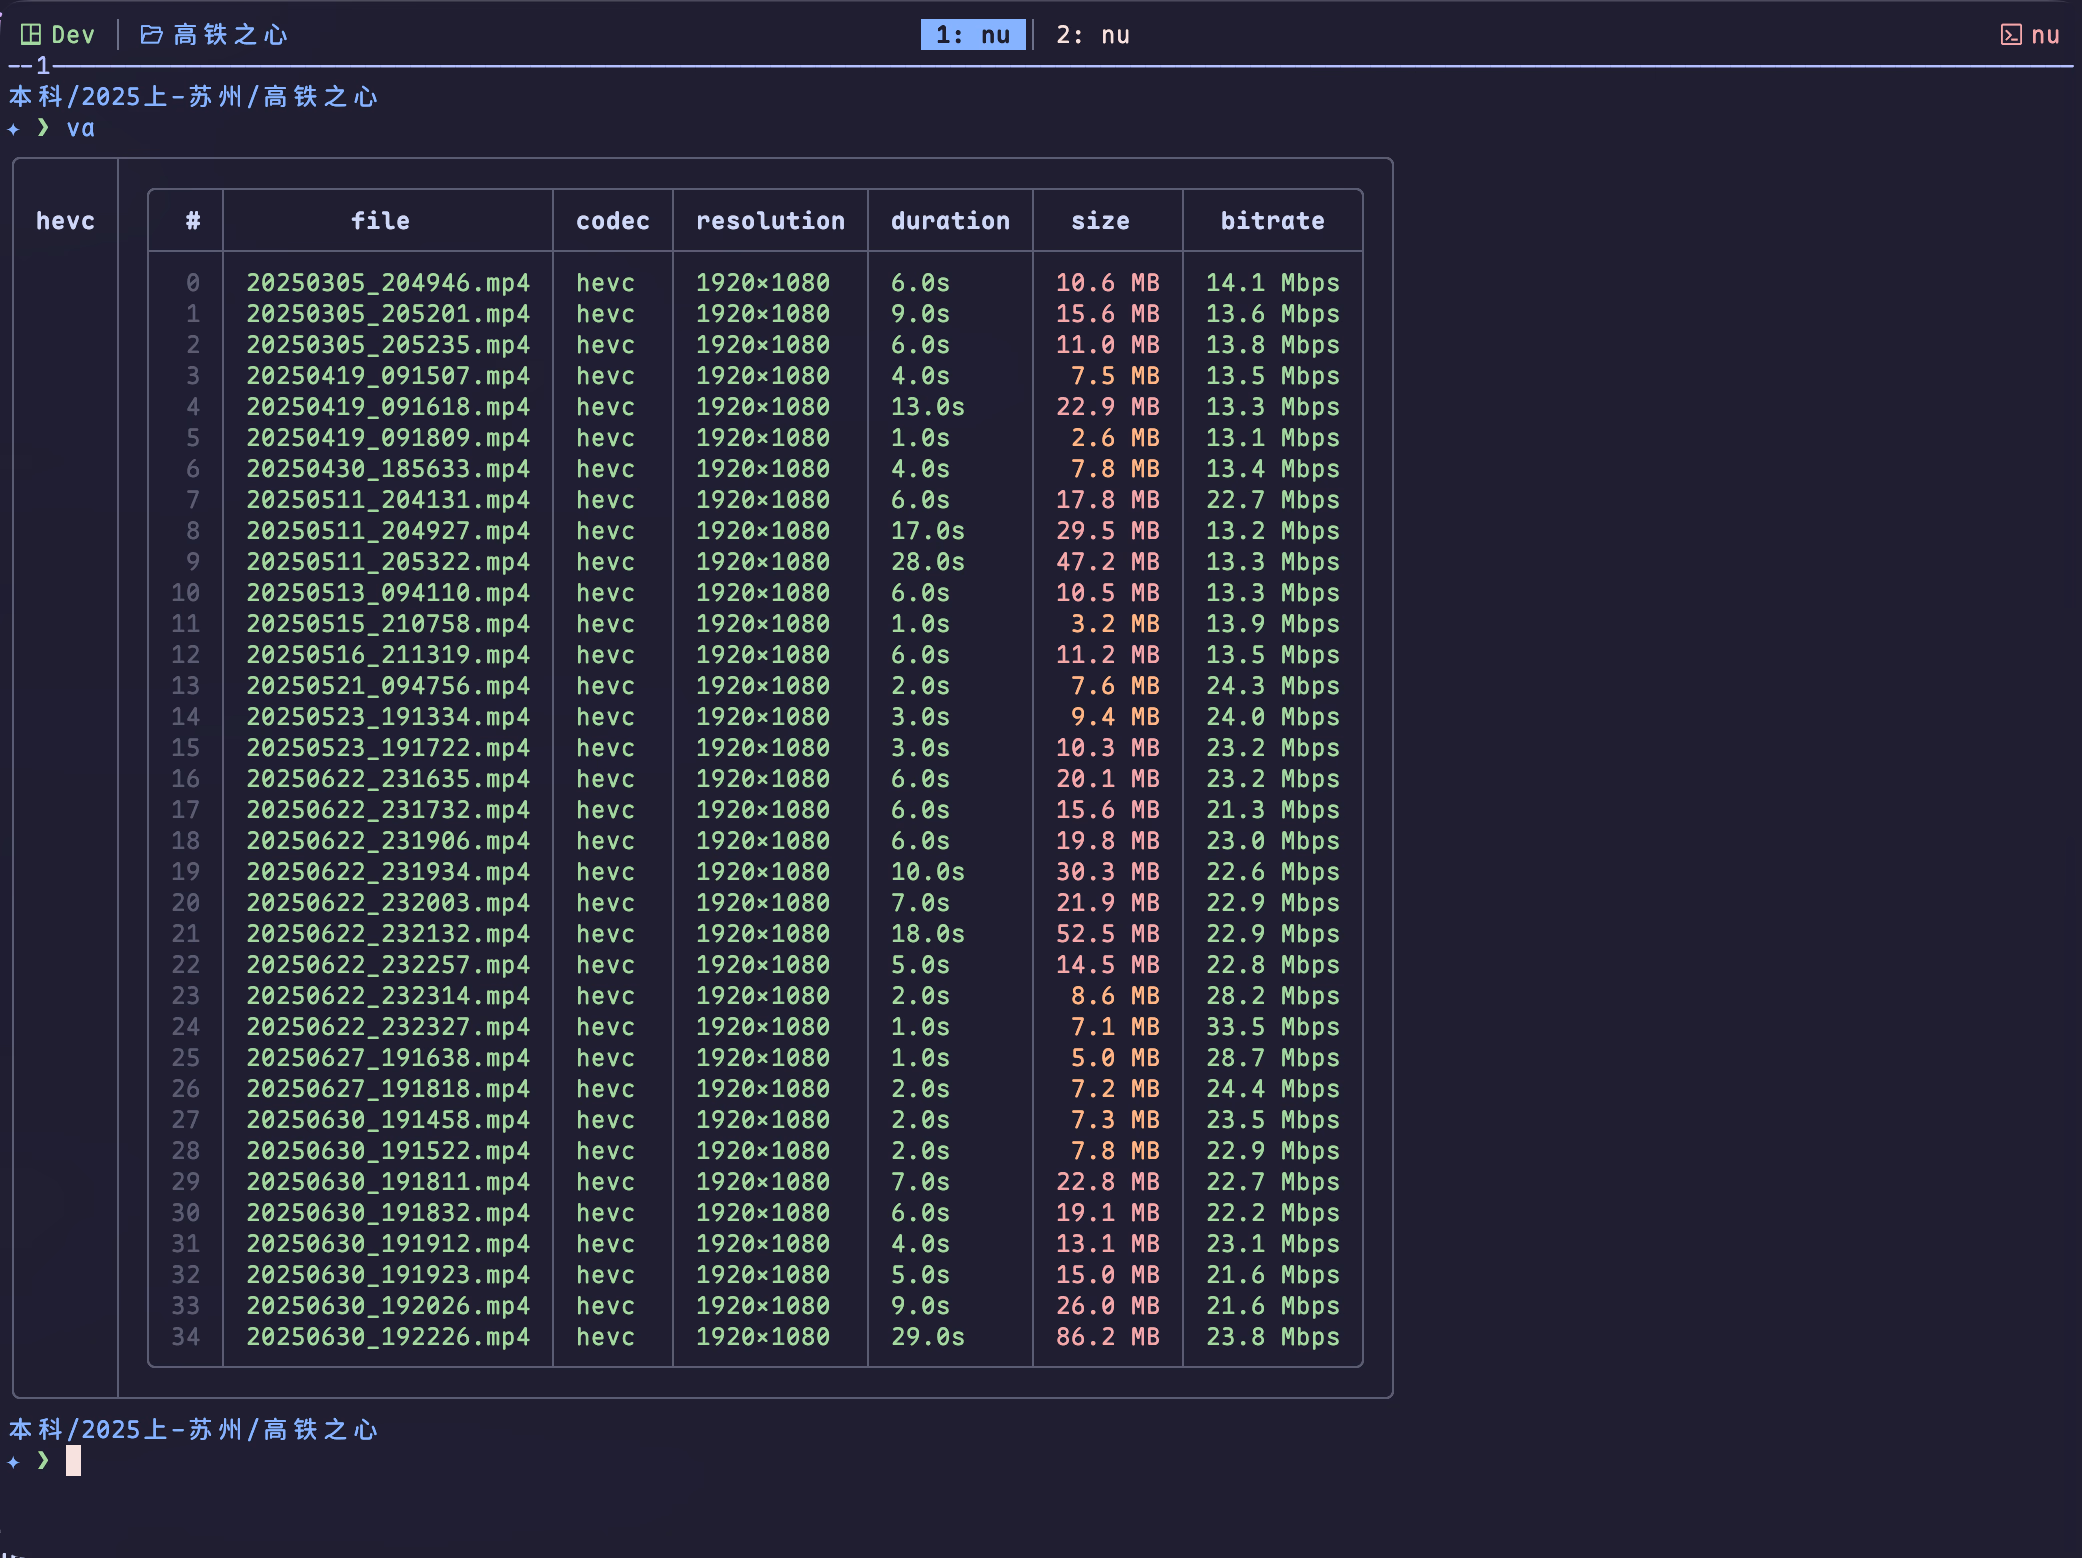
个人云盘中包含 vp9, av1, h264 编码的视频,使用vcodec-analysis函数统计一批视频的编码格式、分辨率等信息。
代码里使用 par-each 并行调用 ffprobe 提取信息,并按编码格式分组汇总。经不严谨测试,查看 32 个视频编码分布情况,使用 each 和 par-each 的时间分别为 1.839s 和 0.439s
def _format_duration [seconds: string] { let sec = ($seconds | into int) let hours = ($sec / 3600 | into int) # 计算小时数 let minutes = (($sec mod 3600) / 60 | into int) # 计算分钟数 let seconds = ($sec mod 60) # 计算剩余秒数 mut result = [] # 只有当值大于0时才添加到结果中 if $hours > 0 { $result = ($result | append $'($hours)h') } if $minutes > 0 { $result = ($result | append $'($minutes)m') } if $seconds > 0 { $result = ($result | append $'($seconds | math round -p 2)s') } $result | str join ' ' # 用空格连接各部分}def _format_bitrate [bitrate: int] { # 将比特率转换为合适的单位 if $bitrate >= 1000000 { let mbps = ($bitrate / 1000000.0 | math round -p 1) $'($mbps) Mbps' } else if $bitrate >= 1000 { let kbps = ($bitrate / 1000.0 | math round -p 1) $'($kbps) kbps' } else { $'($bitrate) bps' }}def _get_video_info [file: string] { # 使用 ffprobe 获取视频流和格式信息 let ffprobe_output = (ffprobe -v error -select_streams v:0 -show_entries stream=codec_name,width,height,bit_rate:format=duration,bit_rate -of json $file | from json) let stream = ($ffprobe_output.streams | first) # 获取第一个视频流 let format = ($ffprobe_output.format) # 获取格式信息 # 格式化时长,如果失败则显示 N/A let duration = try { _format_duration $format.duration } catch { "N/A" } # 格式化比特率,优先使用流的比特率,其次使用格式的比特率 let bitrate = try { let rate = if ($stream.bit_rate | is-not-empty) { $stream.bit_rate | into int } else if ($format.bit_rate | is-not-empty) { $format.bit_rate | into int } else { null } if ($rate | is-not-empty) { _format_bitrate $rate } else { "N/A" } } catch { "N/A" } # 返回视频信息结构 return { codec: ($stream.codec_name) width: ($stream.width) height: ($stream.height) duration: $duration bitrate: $bitrate }}def vcodec-analysis [...paths: string] { let files = (_find_media_paths ...$paths) # 并行执行 _get_video_info 获取信息 $files | par-each {|file| let video_info = (_get_video_info $file.name) { file: ($file.name | path basename) codec: $video_info.codec resolution: $'($video_info.width)x($video_info.height)' duration: $video_info.duration size: $file.size bitrate: $video_info.bitrate } } | group-by codec # 按编解码器类型分组}alias va = vcodec-analysis# 查看当前目录下av1编码的视频元信息va | select av1╭──────┬────────────────────────────────────────────────────────────╮│ │ ╭───┬────────┬───────┬────────────┬───────────┬──────────╮ ││ vp9 │ │ # │ file │ codec │ resolution │ duration │ size │ ││ │ ├───┼────────┼───────┼────────────┼───────────┼──────────┤ ││ │ │ 0 │ 1.webm │ vp9 │ 1920x1080 │ 29m 13.0s │ 280.9 MB │ ││ │ │ 1 │ 2.webm │ vp9 │ 1920x1080 │ 29m 41.0s │ 257.9 MB │ ││ │ │ 2 │ 3.webm │ vp9 │ 1920x1080 │ 29m 49.0s │ 219.4 MB │ ││ │ ╰───┴────────┴───────┴────────────┴───────────┴──────────╯ ││ │ ╭───┬────────┬───────┬────────────┬───────────┬──────────╮ ││ h264 │ │ # │ file │ codec │ resolution │ duration │ size │ ││ │ ├───┼────────┼───────┼────────────┼───────────┼──────────┤ ││ │ │ 0 │ 11.mp4 │ h264 │ 1920x1080 │ 29m 42.0s │ 786.5 MB │ ││ │ ╰───┴────────┴───────┴────────────┴───────────┴──────────╯ │╰──────┴────────────────────────────────────────────────────────────╯# 查看 test.mp4 的视频元信息$ va ./test.mp4╭──────┬────────────────────────────────────────────────────────────╮│ │ ╭───┬────────┬───────┬────────────┬───────────┬──────────╮ ││ h264 │ │ # │ file │ codec │ resolution │ duration │ size │ ││ │ ├───┼────────┼───────┼────────────┼───────────┼──────────┤ ││ │ │ 0 │ 11.mp4 │ h264 │ 1920x1080 │ 29m 42.0s │ 786.5 MB │ ││ │ ╰───┴────────┴───────┴────────────┴───────────┴──────────╯ │╰──────┴────────────────────────────────────────────────────────────╯# 导出成json格式, 也可使用to md/csv/html etc.$ va | to json{ "vp9": [ { "file": "1.webm", "codec": "vp9", "resolution": "1920x1080", "duration": "29m 13.0s", "size": 280957470 }, { "file": "2.webm", "codec": "vp9", "resolution": "1920x1080", "duration": "29m 41.0s", "size": 257923553 }, { "file": "3.webm", "codec": "vp9", "resolution": "1920x1080", "duration": "29m 49.0s", "size": 219479954 } ], "h264": [ { "file": "11.mp4", "codec": "h264", "resolution": "1920x1080", "duration": "29m 42.0s", "size": 786576948 } ]}批量转码
vp9 , hevc, av1 函数分别用于将视频批量转码为 VP9,HEVC (H.265) 或 AV1 格式。视频转码是耗时操作,这里利用 par-each 并行处理可充分利用多核 CPU;转码后的文件存放路径为 ~/Downloads/ffmpeg_out 目录下,默认用 webm 作为容器格式,注意 HEVC 要用 mp4 作为容器格式。
| Target Codec | Encoding Method |
|---|---|
| vp9 | libvpx-vp9 |
| hevc | hevc_videotoolbox(MacOS) |
| av1 | libsvtav1 |
vp9-night是用了 macos 的caffeinate程序,用于防止电脑休眠的,执行软件编码还是挺吃 CPU 的,难免影响电脑使用体验,晚上执行的话就没什么影响了。ps --long | where name has "ffmpeg"查看运行中的ffmpeg任务
def transcode [input_file: string codec: string ext: string = "webm"] { let output_dir = $nu.home-path | path join "Downloads/ffmpeg_out" mkdir $output_dir let base = ($input_file | path parse | get stem) # 获取不带扩展名的文件名 let output_file = ($output_dir | path join $"($base).($ext)") # 构造输出文件路径 # 为不同编码器设置特定参数 # -c:v/vcodec 视频编码器; -q:v/crf 设置视频质量; -b:v 视频比特率 # -c:a 音频编码器 let codec_args = if $codec == "hevc_videotoolbox" { ["-c:v" $codec "-q:v" "70" "-b:v" "6M" "-tag:v" "hvc1" "-c:a" "copy"] } else { ["-vcodec" $codec] } # 执行转码 ffmpeg -i $input_file ...$codec_args $output_file}def vp9 [...input_file: string] { let input_files = (_find_media_paths ...$input_file) $input_files | par-each {|file| print $"Processing: ($file.name)"; transcode $file.name "libvpx-vp9"; }}def hevc [...input_file: string] { let input_files = (_find_media_paths ...$input_file) # 如果是mac,使用hevc_videotoolbox let encoder = if $nu.os-info.name == "macos" { "hevc_videotoolbox" } else { "libx265" } $input_files | par-each {|file| print $"Processing: ($file.name)"; transcode $file.name $encoder "mp4"; }}# AV1压缩率要更好,但个人使用AV1编码速度还是慢于VP9def av1 [...input_file: string] { let input_files = (_find_media_paths ...$input_file) $input_files | par-each {|file| print $"Processing: ($file.name)"; transcode $file.name "libsvtav1"; }}# 睡前压一下视频,macos使用caffeinate避免睡眠alias vp9-night = caffeinate -i nu --config $nu.config-path -c "vp9 ./"alias hevc-night = caffeinate -i nu --config $nu.config-path -c "hevc ./"对比转码前后的文件差异
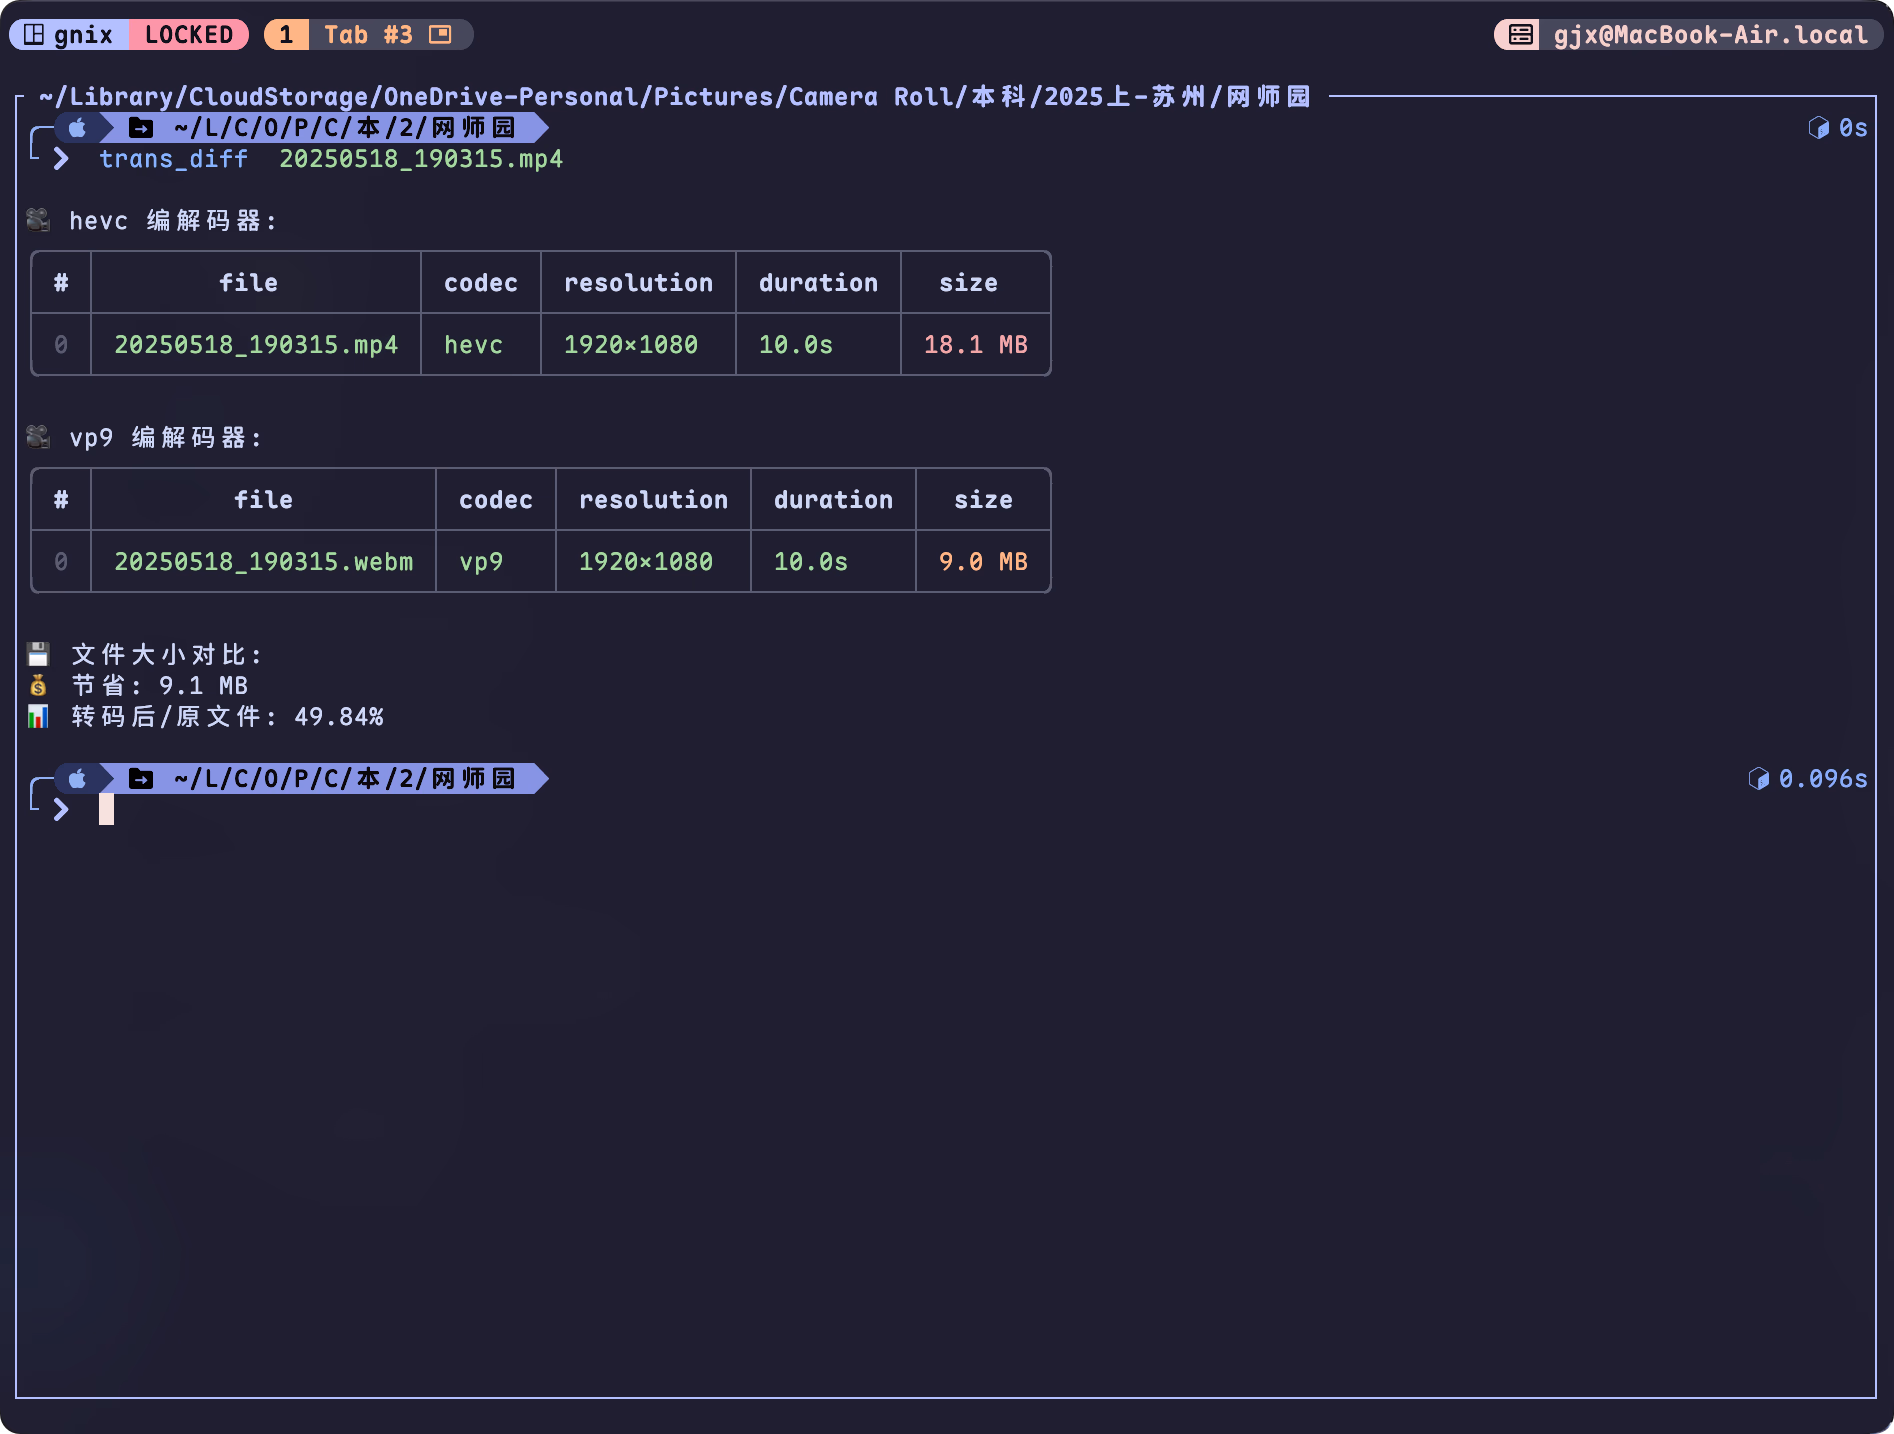
此功能图一乐,对比编码前后体积,偶尔会看到 h264 转码成 vp9 体积反而增加了的情况,不过就遇到两次。
def trans_diff [input_file: string] { let output_file = $"~/Downloads/ffmpeg_out/($input_file | path parse | get stem).webm" # 检查输出文件是否存在 let output_path = ($output_file | path expand) if not ($output_path | path exists) { print $"❌ 输出文件不存在: ($output_path)" return } # 获取文件大小 let input_size = (ls $input_file | get size | first) let output_size = (ls $output_path | get size | first) let saved_size = ($input_size - $output_size) let size_ratio = (($output_size / $input_size) * 100 | math round -p 2) # 显示分析结果 let analysis_result = (va $input_file $output_path) # 展开显示每个编解码器组的详细信息 $analysis_result | transpose codec data | each { |row| print $"\n🎥 ($row.codec) 编解码器:" print ($row.data) } # 打印节省的大小信息 print $"\n💾 文件大小对比:" print $"💰 节省: ($saved_size)" print $"📊 转码后/原文件: ($size_ratio)%\n"}alias td = trans_diffDownload file from Efterklang/dotfiles ↩︎
NuShell FFMpeg Utils