---
title: Consolidate Your Project Commands with Just
date: 2026-02-01
excerpt: Consolidate scattered project commands into a single justfile. Learn how Just simplifies multi-language development workflows with better reusability & documentation.
tags:
- Tmux
- Workflow
- Makefile
- Just
lang: en
---
Modern project development often involves multiple languages and frameworks, each requiring different commands and tools for tasks such as building, testing, linting and formatting.
- **Build**: `{sh} go build`, `{sh} vite build`...
- **Test**: `{sh} go test ./...`, `{sh} bun run test`...
- **Lint & Format**: `{sh} biome check . --write`
- ...
**Just**, a general command runner written in Rust 🦀, allows you to consolidate these scattered commands into a configuration file called `justfile`. These encapsulated tasks are referred to as **recipes**
## Why Use Just
To understand the value of Just, let's compare it with traditional solutions:
1. **Manual Typing or Searching History Commands**: Frequently typing or using Ctrl + R to search history commands, which is inefficient and error-prone.
2. **Writing Shell Scripts**: Writing entry scripts (e.g. `main.sh`) to manage multiple commands, it comes with serveral limitations:
- **Missing features**: To build a user-friendly script, a significant amount of development time is required to implement advanced features like command-line arguments parsing, shell auto-completion (need a lot of work to support a variety of shells such as Nushell which i'm currently using, Zsh, Powershell etc.) and mixing scripts written in different languages (e.g. using Python to batch renaming files).
- **Poor reusability**: While you can write a script to encapsulate multiple commands, it's not easy to reuse them across different projects. You need to copy-paste the script or create symlinks, which is maintenance-intensive. Also, most windows users do not have `bash` installed by default, which makes it even harder to run shell scripts.
- **Documentation maintenance**: Self-made shell scripts usually lack a specific standard, requiring separated documentation to explain how to use it.
To summary, Just addresses at least the following pain points:
- *Feature completeness*: Just supports all the basic features you may need, including command-line arguments parsing, shell auto-completion, and mixing scripts written in different languages via shebangs.
- *Reusability*: just is distributed as a single binary, which means you can install it on any machine with a compatible operating system.
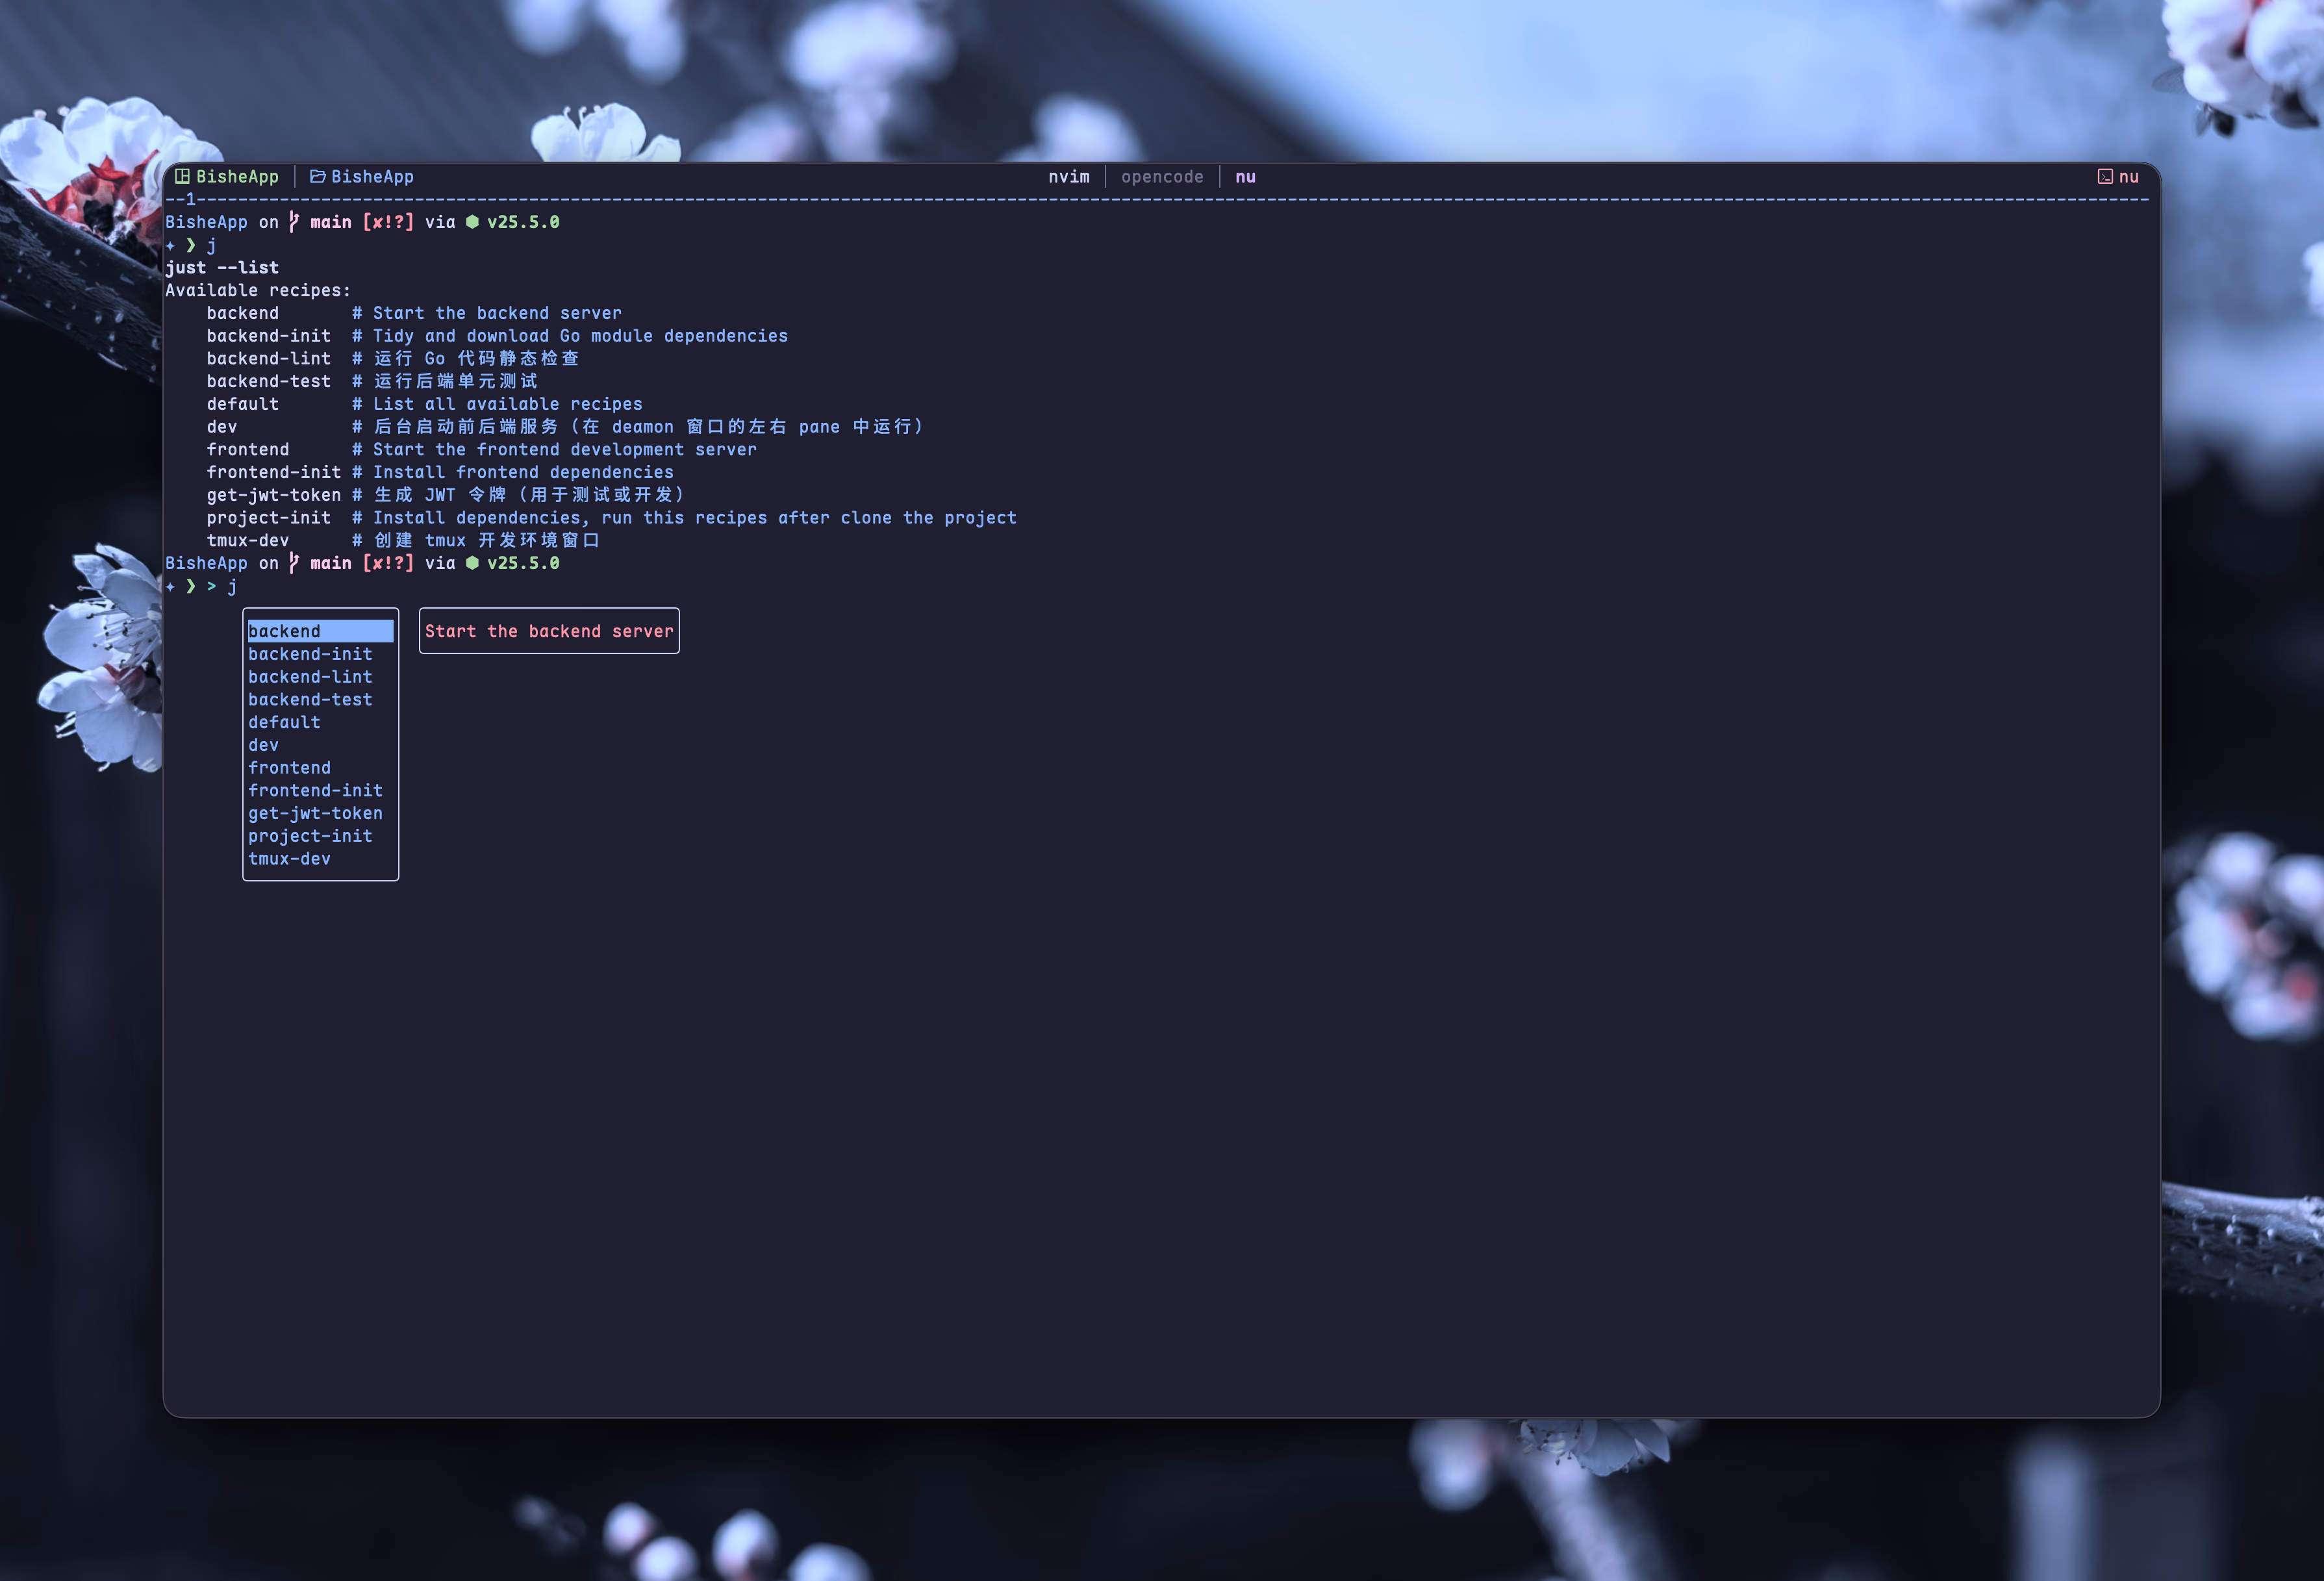
- *Documentation maintenance*: Whether the project is written in Rust or Python, you can run `{sh} just --list` which will automatically list all available tasks, along with comments for each recipe. That is to say, you don't need to maintain a separate documentation for your tasks.
## Basic Usage
To install Just, refer to the [Packages](https://just.systems/man/en/packages.html) page in the Just Programmer's Manual.
```sh
# For example, on macOS, you can install it via Homebrew:
$ brew install just
# On Windows, you can install it via Scoop
$ scoop install just
```
### Quick Demo
Consider a project separated into a Vue 3 frontend and a Golang backend. The project structure is as follows:
```nu
├── client
│ ├── package.json
│ ├── src
│ └── vite.config.js
├── justfile
├── README.md
└── server
├── go.mod
├── go.sum
├── main.go
└── scripts
```
Typically, you launch the frontend server with `{sh} vite` (or `{sh} bun run dev` if use npm scripts [^1]) and start the backend server by running `{sh} go run main.go`.
```just justfile
# List all available recipes
default:
just --list
init: frontend-init backend-init
# Install frontend dependencies
[working-directory: 'client']
frontend-init:
bun install
# Start the frontend development server
[working-directory: 'client']
frontend:
bun run dev
# Tidy and download Go module dependencies
[working-directory: 'server']
backend-init:
go mod tidy
# Start the backend server
[working-directory: 'server']
backend:
go run main.go
```
Here is a breakdown of the `justfile`:
- **Recipe Comment**: Add comments starting with `#` above a recipe. These appear next to the recipe name when you run `{sh} just --list` or use Tab for autocomplete.
- **Working Directory**: Use the `{make} [working-directory: 'dir']` syntax to specify the execution directory. For example, `frontend` recipes run in `client`, while `backend` recipes run in `server`.
- **Dependencies**: Define dependencies using the `{make} recipe-name: dependency` syntax. (e.g. the `init` recipe depends on `frontend-init` and `backend-init`, ensuring they run first)
```sh
$ just init
bun install
bun install v1.3.8 (b64edcb4)
Checked 218 installs across 295 packages (no changes) [37.00ms]
go mod tidy
```
- **Recipe Name**: Define names like `frontend-init` or `backend`. Run them individually via `{sh} just `. The `default` recipe runs automatically if you execute `{sh} just` without arguments.
### Handling Multi-line Logic in Justfile
A common pitfall in `just` is that each line in a recipe is executed as a **separate shell process**. This means variables defined on one line won't persist to the next.[^2]
To write complex logic (like our Nushell script), use a **Shebang Recipe**. This tells `just` to treat the entire block as a single script; Or you can escape newlines with slashes(`\`)
```just
# Using slashes
conditional:
if true; then \
echo 'True!'; \
fi
# Using shebang
conditional:
#!/usr/bin/env sh
if true; then
echo 'True!'
fi
```
## Advanced
### Recipe with Parameter
In a `justfile`, you can define recipes that accept command-line arguments by placing the variable name after the recipe title. To use these arguments inside your recipe, you wrap them in double curly braces: `{{argument_name}}`.
Also, you can prefixed parameter with a `$` it will be exported as environment variables
```just justfile
# 1. Parse the URL path using Nushell's structured data engine
# 2. Construct the rclone path and execute the deletion
[group: 'image']
delete-asset $url:
#!/usr/bin/env nu
let filename = ($env.url | url parse).path;
let target = $"bit_s4:vluv-space($filename)";
print $"[INFO] Preparing to delete: ($target)";
rclone deletefile $target
print $"[DONE] Task completed"
```
For detail, read [Recipe Parameters - Just Programmer's Manual](https://just.systems/man/en/recipe-parameters.html?highlight=argument#recipe-parameters)
### Tips
1. Run `{sh} just --choose` to fuzzy-find recipes via fzf
2. Add `[group: 'dependency']` above a recipe to set its group; this setting affects how recipes are displayed when running `{sh} just --list`
3. Run any recipe with `{sh} just ` or open the Justfile with `{sh} just --edit` (or `{sh} just -e`) **from any subdirectory** — `just` automatically searches upward and finds the nearest `Justfile`
### Enhance Workflow with Tmux
Terminal multiplexers like tmux allow you to create new window or split the window into multiple panes via **command line interface**. If you use kitty or zellij, you can do so with their respective commands.
Here are two recipes I use to set up the development environment:
- **tmux-dev**: Rename the current window to `daemon` and split it into two panes, then create two additional windows—one for [[ai_skills|`opencode`]] and one for ` nvim `
- **dev**: Start the backend and frontend servers in the two panes of the `daemon` window
- **stop-dev**: Stop the backend and frontend services
::: tabs
@tab:active Preview
@tab Recipe
```just justfile
tmux-dev:
#!/usr/bin/env bash
# Get the current tmux session name
SESSION=$(tmux display-message -p '#S')
# Create the daemon window with 2 panes
tmux rename-window daemon
tmux split-window -t $SESSION:daemon -h
# Create the nvim window
tmux new-window -t $SESSION -n nvim
# Create the opencode window
tmux new-window -t $SESSION -n opencode
# Start backend and frontend services in the background (running in daemon window's left and right panes)
dev:
#!/usr/bin/env bash
SESSION=$(tmux display-message -p '#S')
# Start backend in daemon window's left pane
tmux send-keys -t $SESSION:daemon.1 'just backend' Enter
# Start frontend in daemon window's right pane
tmux send-keys -t $SESSION:daemon.2 'just frontend' Enter
echo "✓ Backend started in daemon.1"
echo "✓ Frontend started in daemon.2"
# Kill backend & frontend services
stop-dev:
#!/usr/bin/env nu
ps --long | where command == "go run main.go" | first | kill $in.pid
ps --long | where command == "bun run dev" | first | kill $in.pid
```
:::
## Conclusion
Just transforms how you manage project tasks across different languages & frameworks. By centralizing commands in a single justfile with clear documentation & reusable recipes, you reduce friction during development setup & execution.
The same idea is used in `package.json` scripts and Makefiles, but I choose Just for its simplicity, rich features and comprehensive docs.
Whether you're working on a simple Golang project or managing complex multi-service architectures, Just provides a lightweight, portable solution that works consistently across macOS, Linux, & Windows. Start with a basic justfile today & gradually expand it as your project grows.
[^1]: The `"scripts"` property of your `package.json` file supports a number of built-in scripts and their preset life cycle events as well as arbitrary scripts. These all can be executed by running `{sh} npm run `. _Pre_ and _post_ commands with matching names will be run for those as well (e.g. `premyscript`, `myscript`, `postmyscript`). Scripts from dependencies can be run with `{sh} npm explore -- npm run `. [docs.npmjs.com/cli/v11/using-npm/scripts](https://docs.npmjs.com/cli/v11/using-npm/scripts)
[^2]: check [Multi-Line Constructs - Just Programmer's Manual](https://just.systems/man/en/multi-line-constructs.html?highlight=multi#multi-line-constructs)